Creating Immutable Backups with Commvault and Zadara Object Storage
In an age where cyber threats such as ransomware are rampant, creating immutable backups is crucial for safeguarding your organisation’s data. The combination of Commvault and Zadara Object Storage provides a robust solution for this purpose. In this Blog we are going to explore how we can deliver an immutable backup and recovery platform.
Why Zadara and Commvault form a good recovery capability
- Commvault is a leading enterprise-grade backup and recovery solution known for its flexibility, advanced features, and support for various storage platforms.
- Zadara Object Storage is a high-performance, scalable, and secure storage platform offering Object Lock functionality, which supports immutable backups. Immutable storage prevents data from being modified or deleted within a specified retention period, ensuring compliance and protection against ransomware.
Together, these solutions allow organisations to achieve secure, reliable and compliant data protection.
Best Practices
- Use Multi-Factor Authentication (MFA): Protect access to both Commvault and Zadara with MFA to prevent unauthorized changes.
- Define Retention Policies Carefully: Avoid setting excessively long retention periods unless necessary, as these settings cannot be modified retroactively.
- Regularly Review Audit Logs: Both Commvault and Zadara offer logging capabilities to track backup and storage activities.
- Integrate with Compliance Standards: Ensure that your immutable backups meet legal and industry-specific regulations such as GDPR, HIPAA, or CCPA.
Ongoing: Monitor and Manage Backups
- Verify Backup Integrity
- Use Commvault’s built-in validation tools to ensure that backups are complete and recoverable.
- Monitor Immutability
- Regularly check the retention policies in Zadara and Commvault to confirm compliance with your data protection strategy.
- Perform Recovery Drills
- Test your ability to restore data from immutable backups to ensure preparedness for disaster recovery scenarios.
Step-by-Step Guide
Step 1: Configure the Zadara Object Storage
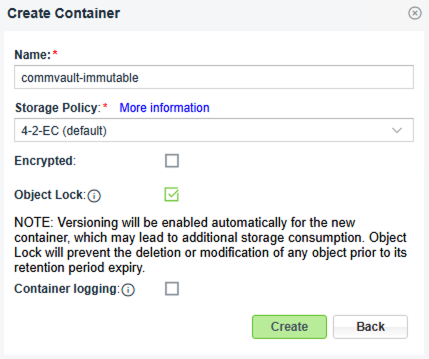
1. Set up a Container with Object Lock enabled
- Log in to the Zadara Object Storage Management User Interface.
- Navigate to the Console section and Add a new container.
- Enable the Object Lock feature during container creation. This will allow the container to support Write Once, Read Many (WORM) policies.
2. Create a Lifecycle Policy
- Select the newly created object locked container
- In the South pane, select the Object Lifecycle Rules tab.
- Click on Add.
- Provide a name for the lifecycle rule.
- Status should be Enabled.
- Enable Permanently delete noncurrent versions of objects and specify a timeframe.
- IMPORTANT: the value specified here must be at least one day greater than the value specified in the Commvault WORM lock retention period.
- Enable Delete expired object delete markers
- Acknowledge the note.
- Create.


- Locate Access Credentials
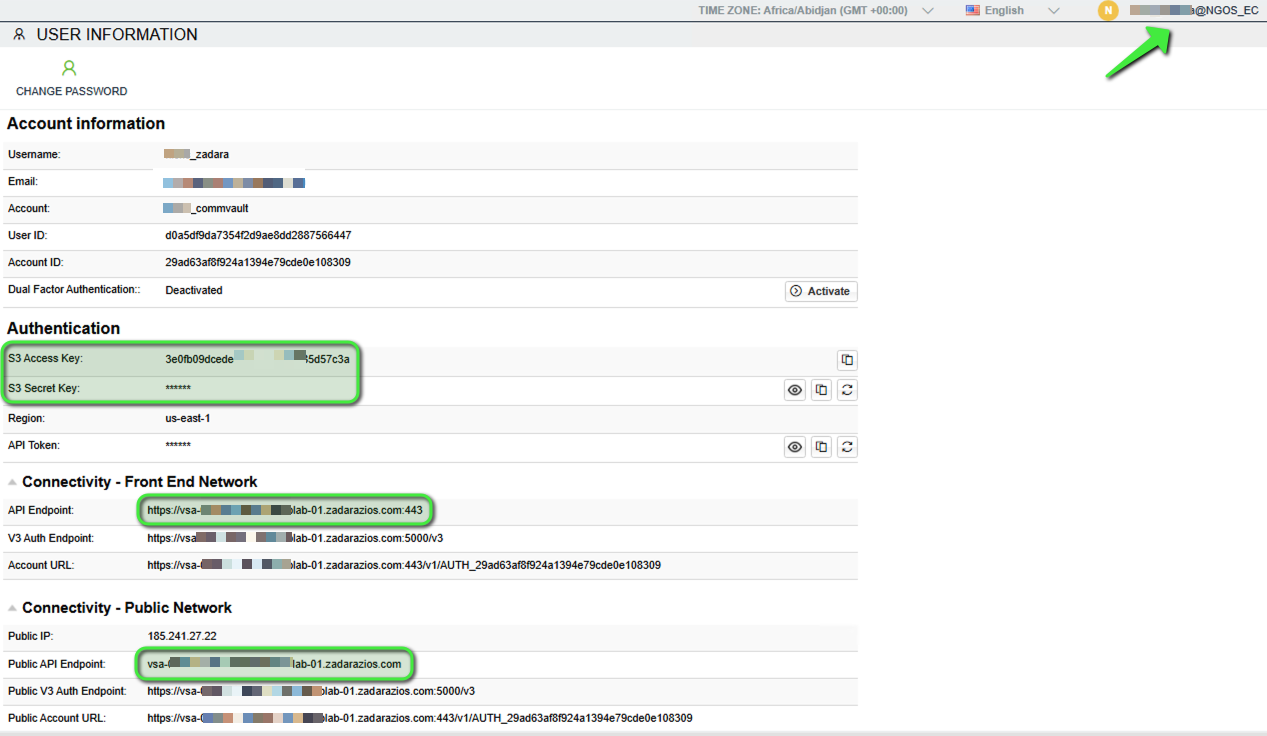
- The Access Key, Secret Key and API Endpoint for the Object Store can be found under “User Information” by clicking on the username at the top-right corner of the UI. These credentials will be used by Commvault to authenticate and interact with the Zadara container.
- Note: For internal/private access, select the Front End API endpoint. If using a Public IP address and URL, select the Public API endpoint.
4. Verify Object Lock
- For peace of mind the Object Lock functionality should be tested by uploading and attempting to modify or delete a file. This ensures that immutability is configured correctly and working as expected.
- More information, along with some example steps to follow, can be found in the Zadara User Guide here.
Step 2: Integrate Zadara with Commvault
- Add Zadara as a Cloud Storage component in Commvault
- Firstly, ensure that the latest version of Commvault is being used. Here we tested with version 11.34.
- Open the Commvault Web Console and navigate to Command Center.
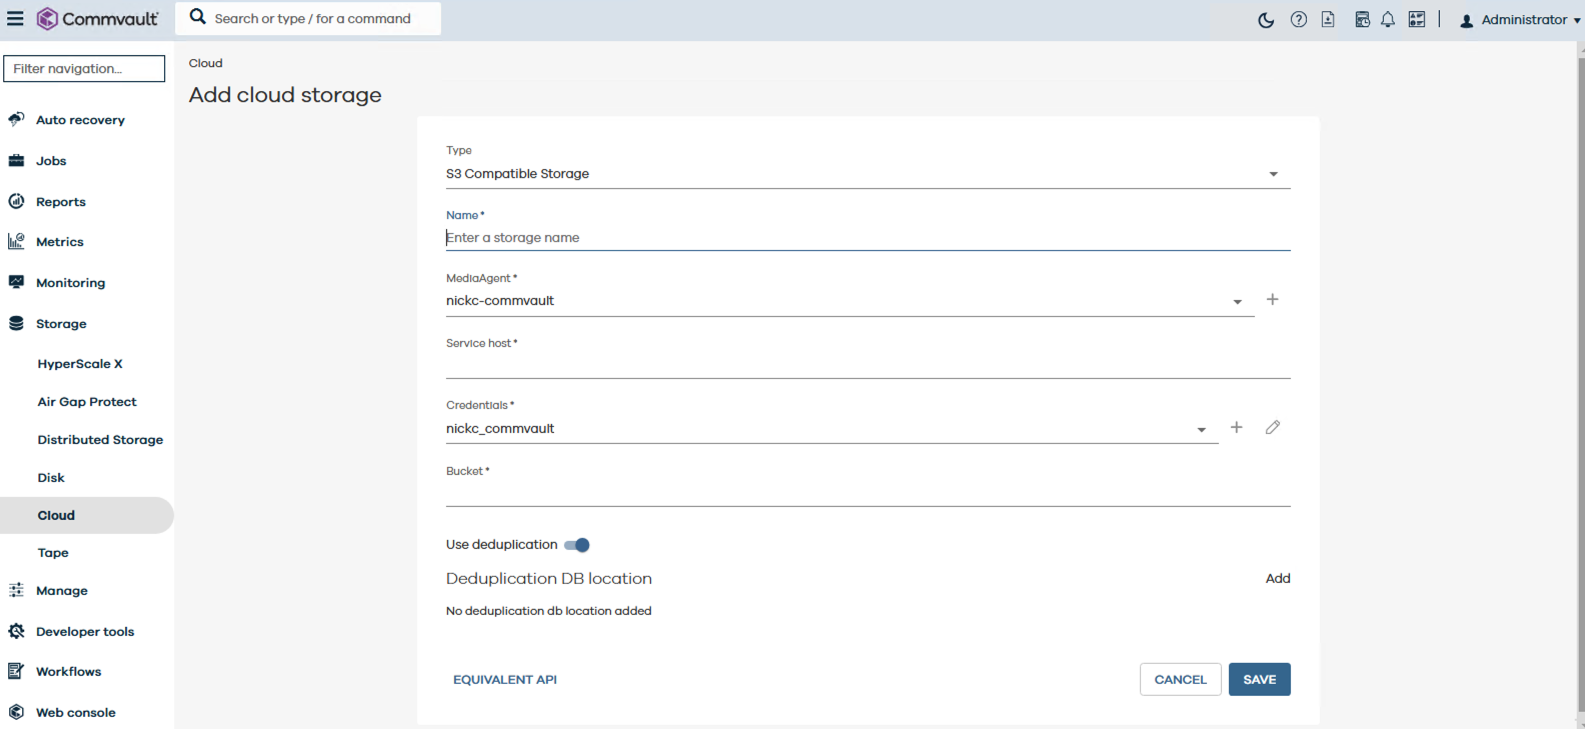
- Then go to Storage > Cloud and click Add.
- Choose S3-Compatible Storage as the cloud storage type.
- Enter a name for this storage component.
- Select the relevant Media Agent.
- For Service host enter the API endpoint URL for Zadara (e.g., https://[your-zadara-endpoint]).
- Create a new entry for Credentials and enter the Access Key and Secret Key obtained in Step 1.
- Under Bucket enter the name of the object locked container created in Step 1.
- Enable Deduplication (optional) – enabling deduplication should optimise storage usage and reduce costs
- Add a Deduplication DB location.
- Save the new Cloud Storage component
- If successful, the Status will display Online.
- If successful, the Status will display Online.
Step 3: Enable WORM storage lock and Compliance lock
- Navigate to the newly created Cloud Storage component and click on its name.
- Click on Configuration.
- In the WORM section, click on the radio button to enable WORM storage lock
-
- Specify the required immutability Retention period.
-
- A Plan will be assigned in the next Step.
-
- Click OK to save.
-
- Read and acknowledge the statements and warning message before typing ‘Confirm’ and finally click Confirm.
- Compliance lock is automatically enabled.
Step 4: Create a Backup plan and job which utilizes immutability
- Define a Backup Plan
- In Commvault, navigate to Manage > Plans.
- Create a new Server backup plan (or use an existing one as a template).
- Provide a name for the plan.
- Add a backup destination for a new backup copy.
- Provide a name for the new Add copy.
- Select the Storage container created in Step 1.
- The Retention period will be greyed out since WORM lock has been configured on the Storage component.
- Click Save.
- Click Next.
- Configure the RPO and Backup window settings as required.
- Configure Snapshot options as required.
- Submit.
2. Configure a File Server to be backed up
-
- In Commvault, navigate to Protect > File Servers.
- Select File Server. Next.
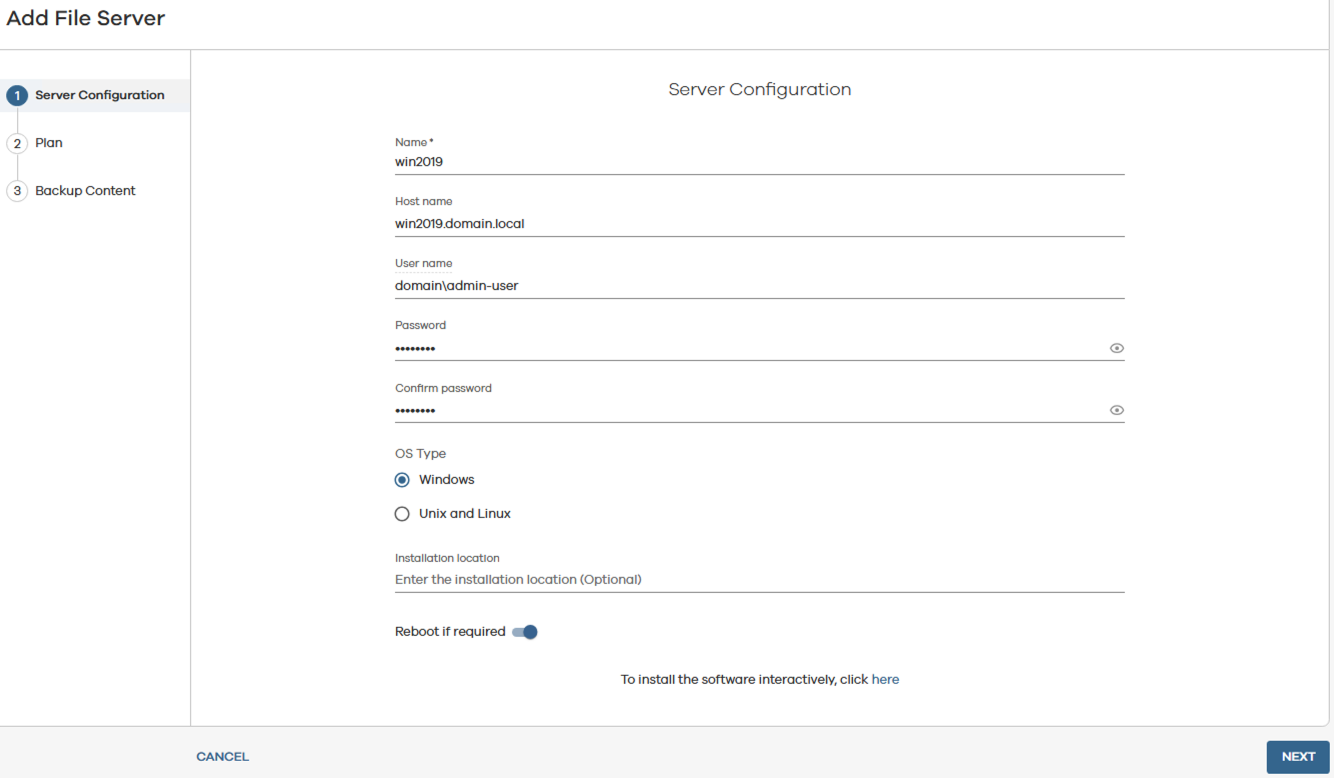
- Start typing the name of the server, then click on Add new server when it appears.
- Provide the name of the server to be backed up.
- Provide the fully qualified host name for the server.
- Provide a Username with sufficient privileges to backup up the server.
- Provide the password.
- Select the appropriate OS type.
- If necessary, enable Reboot if required.
- Next.
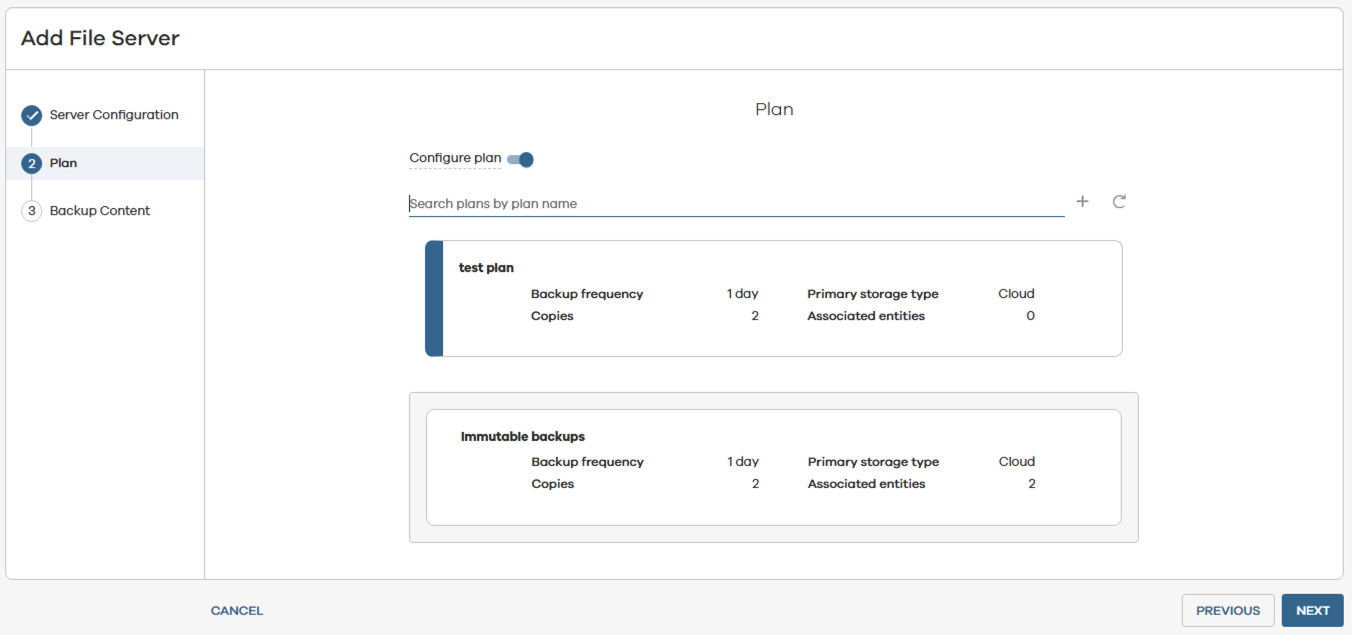
- Assign the Plan created in Step 4.1.
- Next.
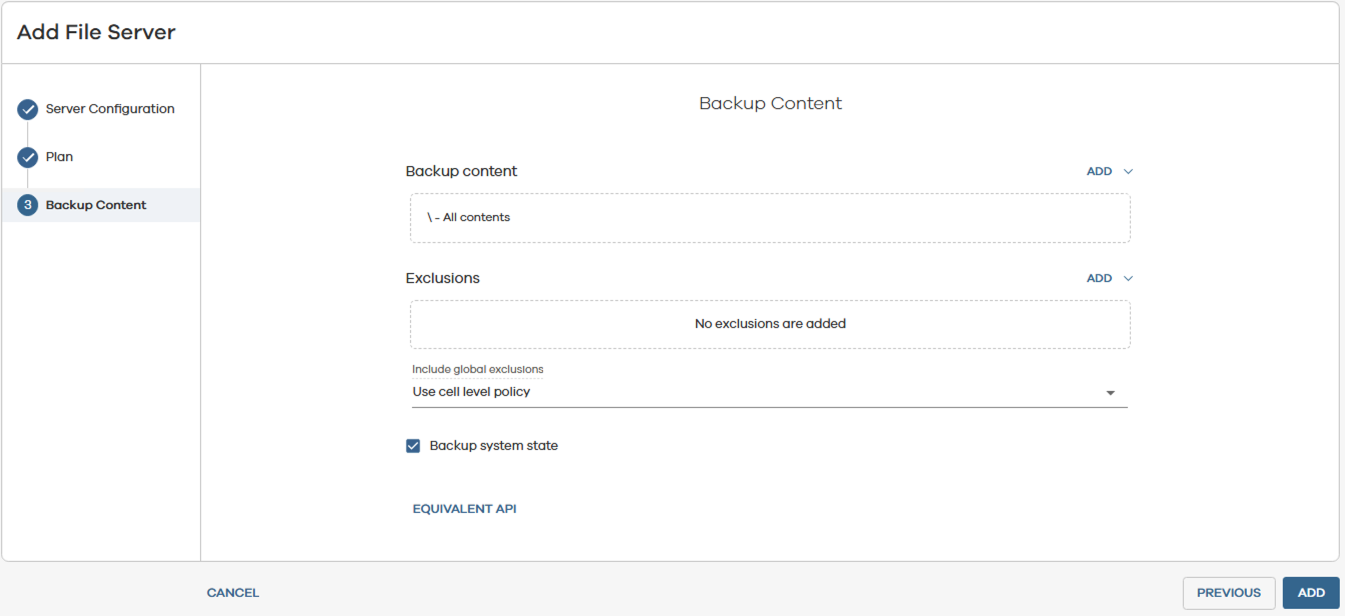
- Configure Backup Content as required.
- Add.
- The Commvault agent should subsequently be installed on the File Server.
3. Run an initial Backup job
- Perform an initial backup to populate the Zadara bucket with immutable data.
- In Commvault, navigate to Protect > File Servers > File Servers.
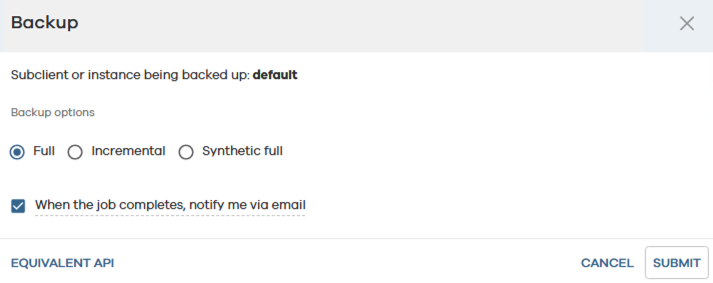
- Under Actions on the right, for the File Server just added, click on the three dots and select Backup.
- Select the Full backup option.
- Click on Submit.
- The backup progress can be monitored under Jobs > Active Jobs.
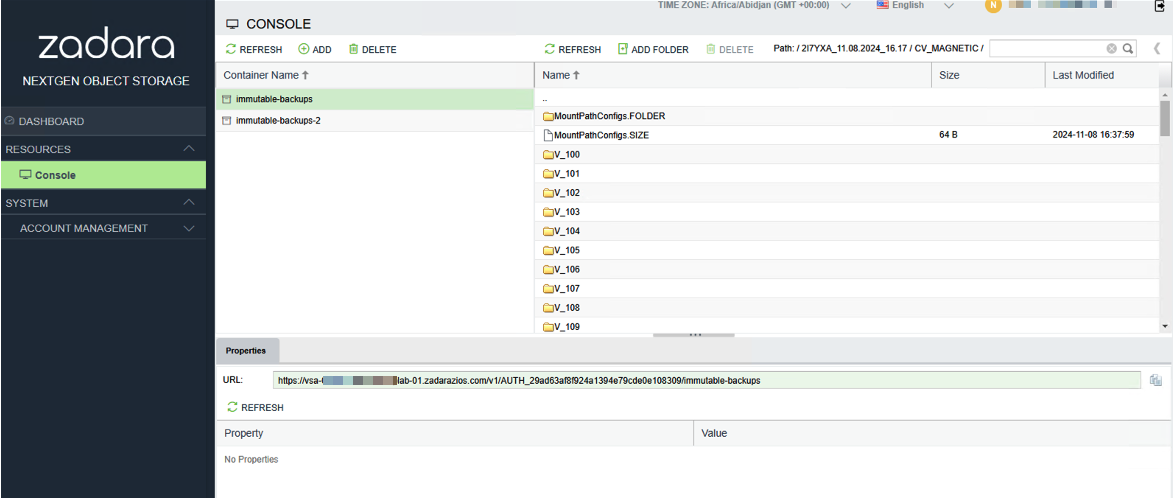
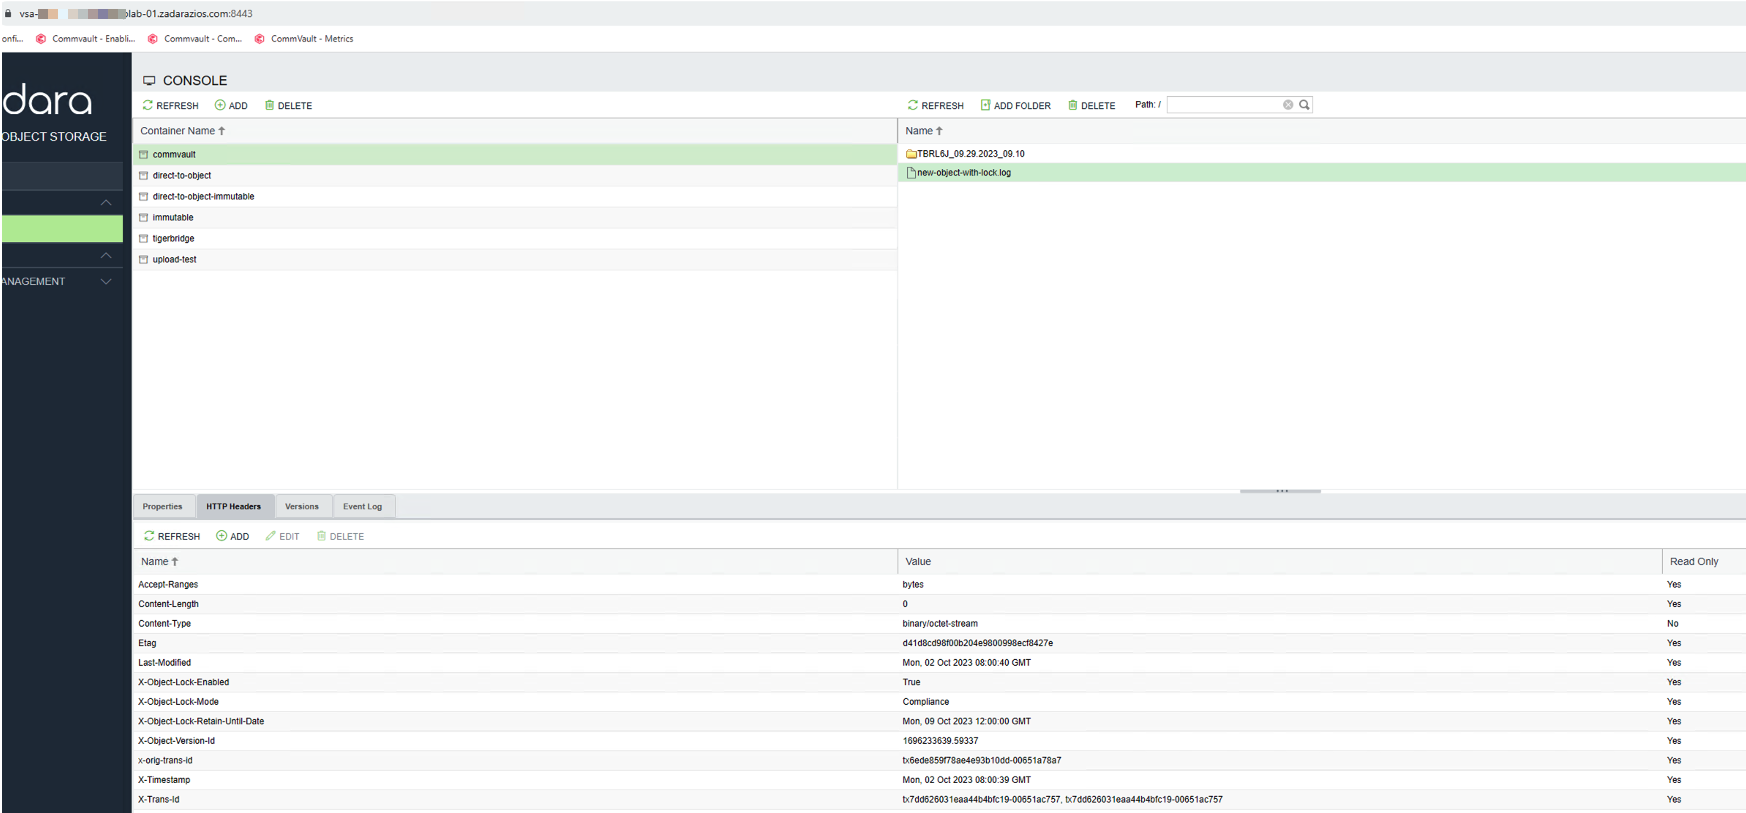
- The Objects can be viewed in the Zadara Object Storage User Interface or using a 3rd party software application such as S3 Browser.
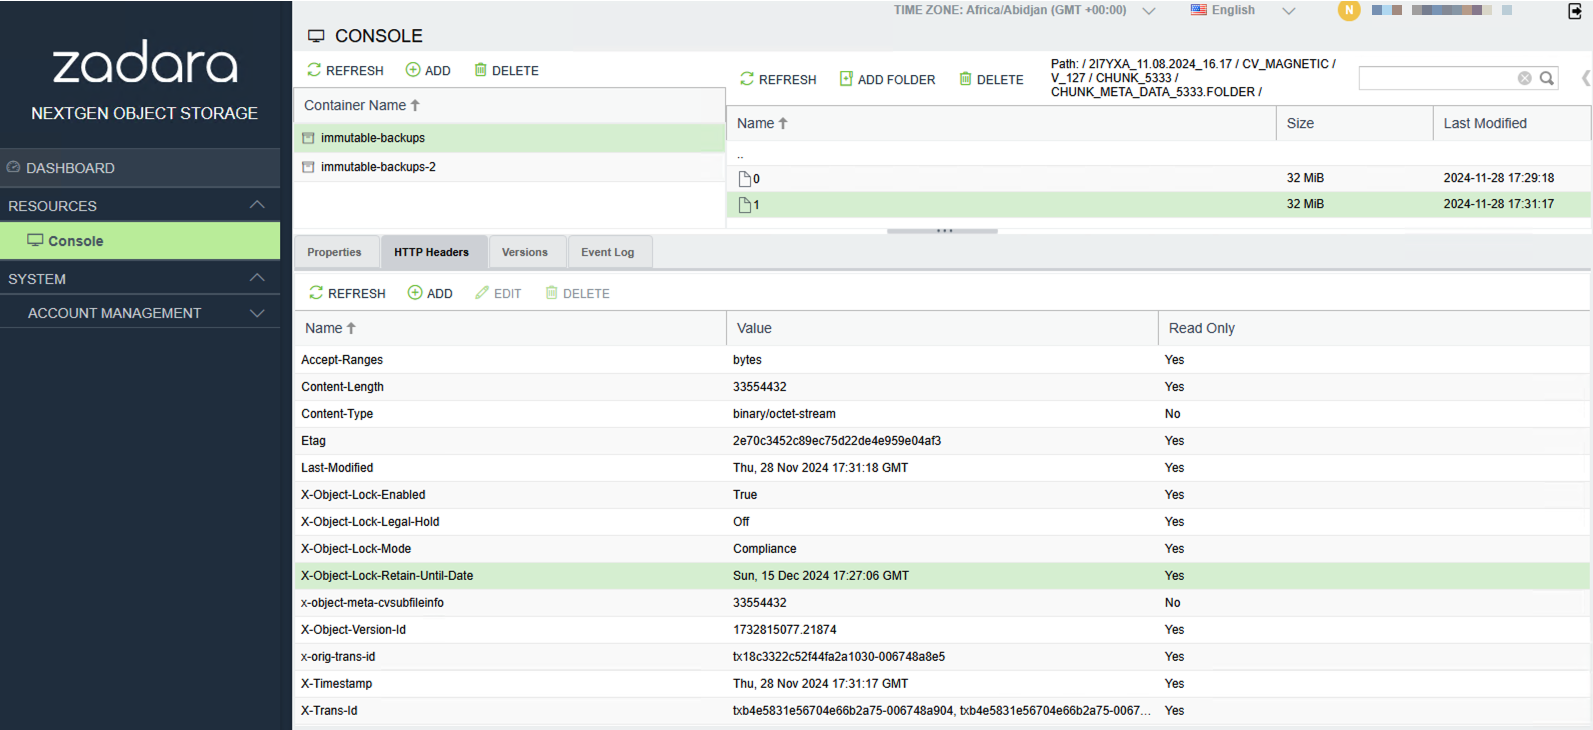
- The Object-Lock-Retain-Until-Date (i.e. the immutable retention date) date can be found under the HTTP Headers tab in the South pane for each Object.
- Note: Commvault will add 7 days to the WORM Lock retention period set earlier
You now have immutable backups configured.
Step 4: Testing immutability and recovering impacted data
As detailed in Step 1.4, when an Object has a retention date and time set on it which is in the future it cannot be deleted. However, in some situations the objects can “appear” to have been deleted. In this case the objects are replaced with delete markers. The following section describes this scenario and how to recover the “deleted” objects.
When attempting to delete a locked object from the CLI using the API command, the operation is blocked:
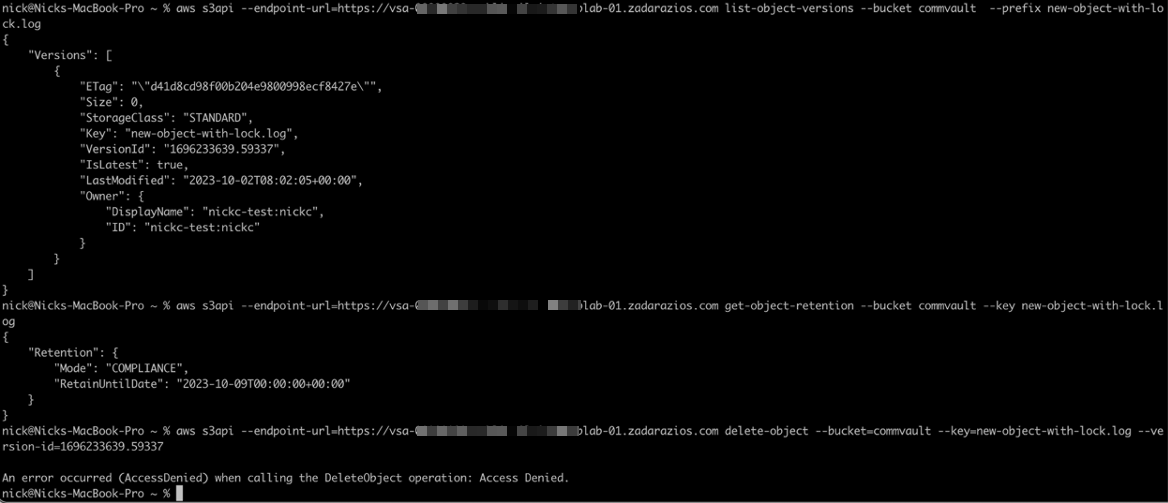
However, in the GUI, the delete request can be processed and appears to be successful. Note the version ID for later (ending 59337):
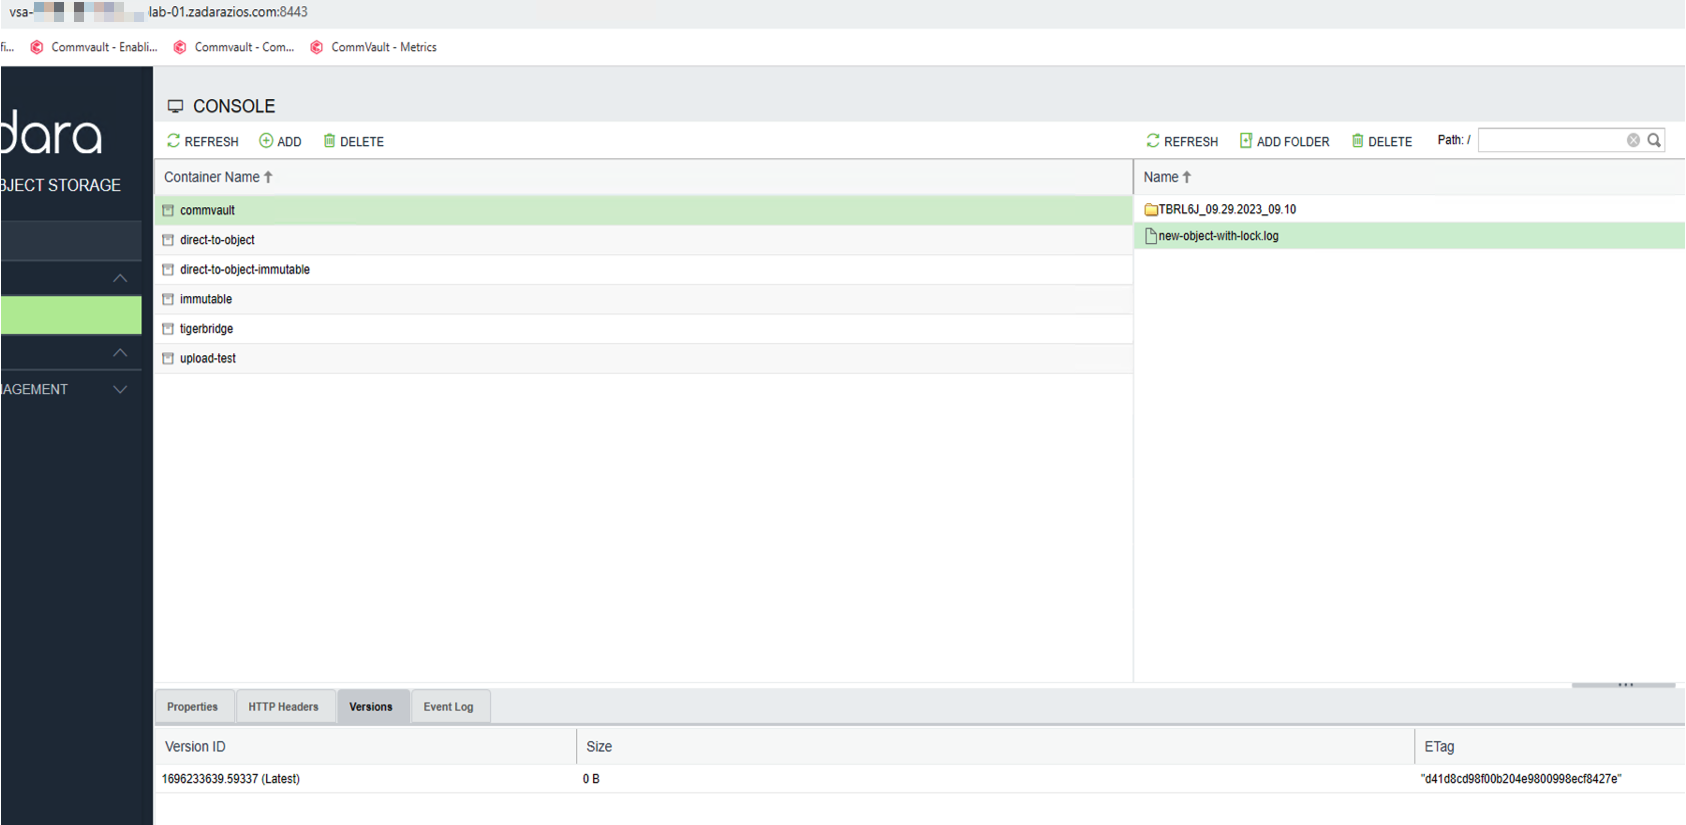
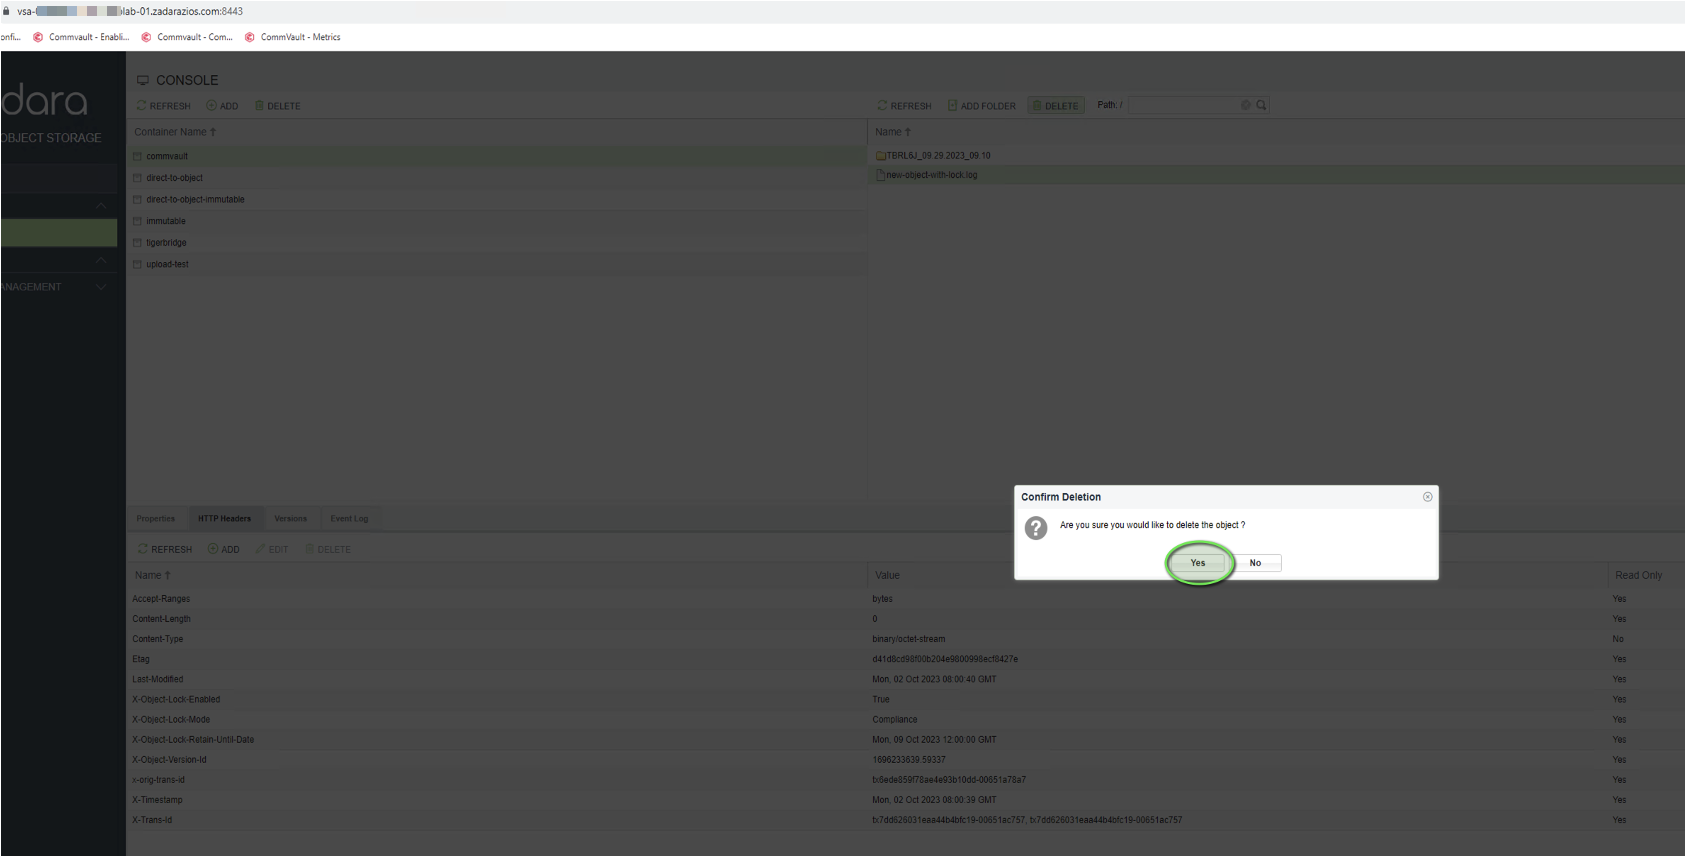
The X-Object-Lock-Retain-Until-Date is in the future:
Delete the Object in the UI and it appears to be successful:
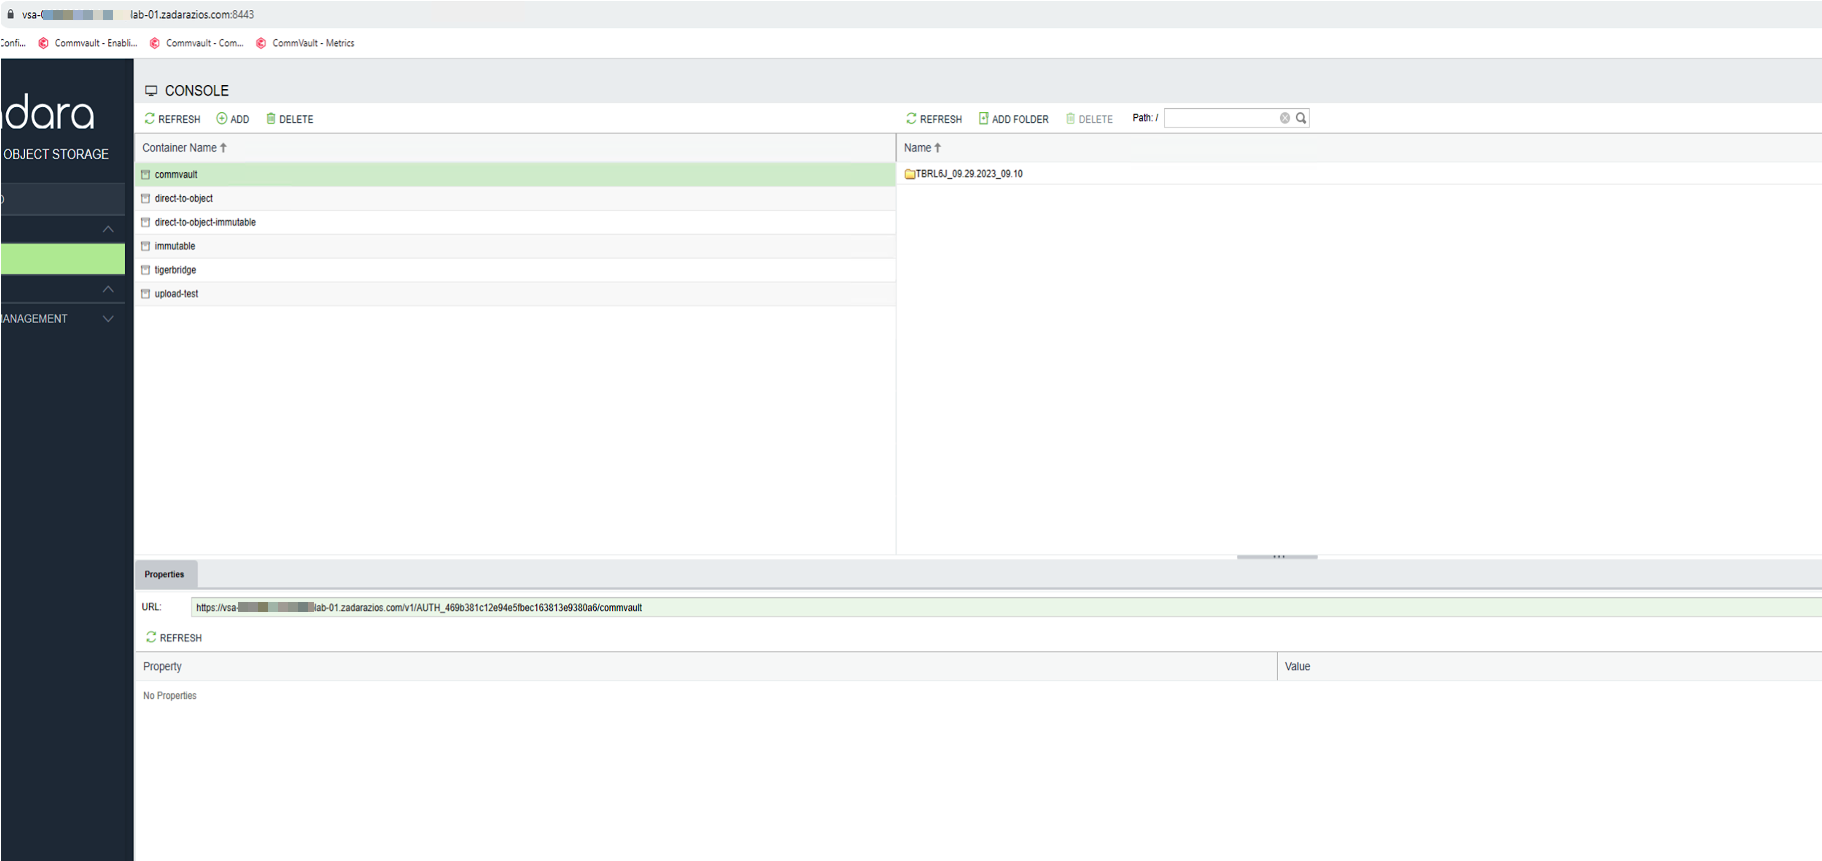
The object no longer appears in the GUI:
However, the object is still there and can be seen from the CLI (version ID ending 59337):
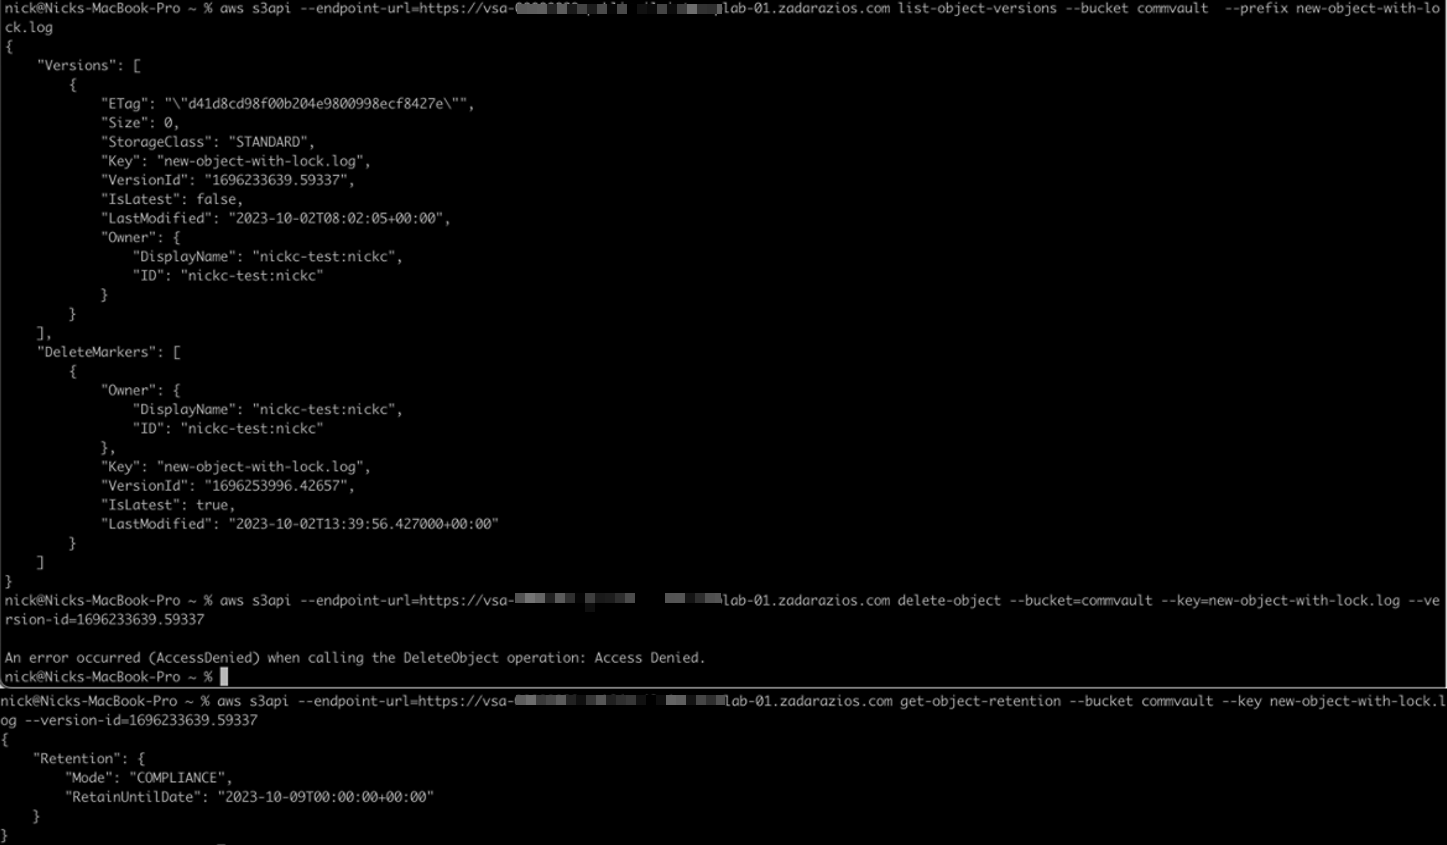
The Object has been masked by a delete marker. The delete marker fools the attacker or software into thinking the deletion has been successful.
In this current state, Commvault would not be able to restore the Object(s) as it too will not see them anymore.
To “recover” the hidden Objects the delete markers need to be deleted.
The required information can be found on AWS here.
To check for the existence of delete markers use the following command to list a selection of specific objects to identify that “DeleteMarkers” exists and is the latest version of the object:
aws s3api –endpoint-url=<URL> list-object-versions –bucket <bucket-name> –prefix “<Folder>/<sub-folder>/<object_name>”
For example:
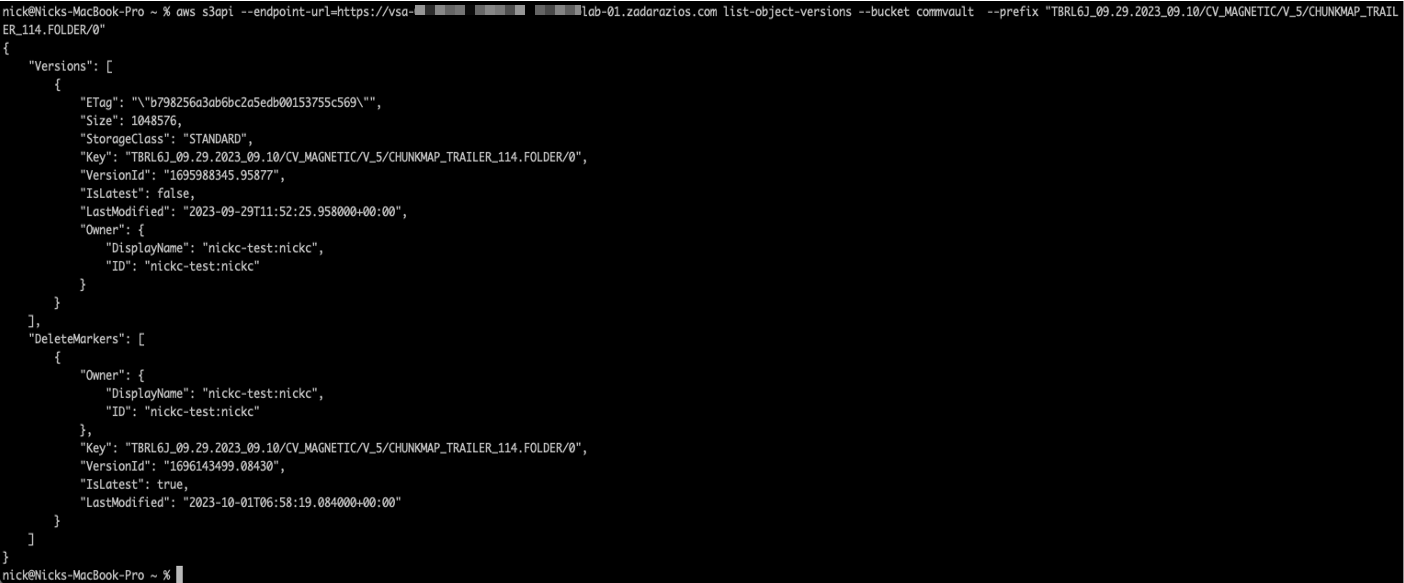
Once the existence of delete markers has been confirmed, the following script will list and then delete all of the delete markers in the specified location (i.e. could be a top-level, all-encompassing folder):
aws s3api –endpoint-url=<URL> list-object-versions –bucket <bucket-name> –prefix “<Folder>/<sub-folder>/“ –output json –query ‘DeleteMarkers[?IsLatest==`true`].[Key, VersionId]’ | jq -r ‘.[] | “–key ‘\”” + .[0] + “‘\” –version-id ” + .[1]’ | xargs -L1 aws s3api –endpoint-url=<URL> delete-object –bucket <bucket-name>
(Note: this requires “jq” to be installed)
While the above script is running, the expected output looks like this:
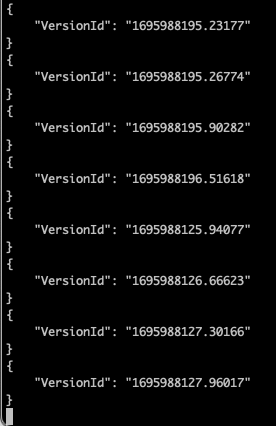
In the NGOS GUI the “deleted” folders and contents will then reappear.
At this point it will be possible to run a restore job in Commvault to recover the Object(s).
Conclusion
By integrating Commvault with Zadara Object Storage, you can create a robust, scalable, and immutable backup solution that protects your data against threats like ransomware and malicious or accidental deletion. This combination not only ensures data security but also helps meet regulatory compliance requirements.
Investing in immutable backups is an essential step in modern data protection strategies. Follow this guide, and you’ll be well-equipped to safeguard your organisation’s critical data.contain

